In this tutorial, I’ll show you how to issue a refund in the Canadian version of QuickBooks Online.
Quick Note: I’ll be showing you how to issue a refund receipt to record that you’ve given money back to your client. This is different from a credit memo, which is when you issue your customer credit that they can use for future purchases.
Quick Instructions:
- In the upper left corner click +New
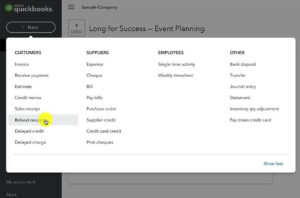
- Click Refund receipt in the CUSTOMERS column
- Fill in the Receive Payments screen
- Customer: Who’s receiving the refund
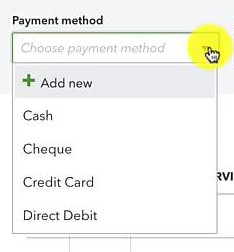
- Payment method: How you issued the refund
- Refund from: What account did the money come out of
- PRODUCT/SERVICE: What is being refunded
- QTY: How many are being refunded
- RATE: How much did it cost
- SALES TAX: Canadian tax code used
- Click the green Save and Close button
Creating a Refund Receipt Canadian QBO
To start click the + New button in the upper left-hand corner. Then select Refund receipt in the CUSTOMERS column.
On the Receive Receipt screen select the customer you’re refunding. Then enter the date of the refund.
Under Payment method select the method used to refund the customer from the drop-down.
Under Refund from select the account that the money is coming out of.
If you select a chequing account you’ll be able to enter the cheque number. If you’re doing an e-transfer from a chequing account you can delete the number in the Cheque no. box.
Under PRODUCT/SERVICE select what product/service the customer is getting a refund for.
DESCRIPTION will be automatically filled in after you select a product/service. You can edit this if you’d like.
Next enter the QTY of product/service that is being refunded and the RATE.
Under SALES TAX select the appropriate sales tax code for the refund.
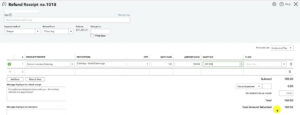
The sales tax will be calculated and added to the total.
Here’s an example of what this looks like:
You can now click the green Save and close button.
This process creates a record of the refund you issued to your customer in the client record, sales tax module, and bank register of QuickBooks.
When the money comes out of your bank account you’ll be able to match the bank record with the refund receipt.
Note: This process is just logging the refund in QuickBooks. It does not actually initiate the refund to the customer.
You now know how to record a refund in QuickBooks Canada.
☕ If you found this helpful you can say “thanks” by buying me a coffee…
https://www.buymeacoffee.com/gentlefrog
Below is a video if you prefer to watch me show you how to do this.
If you have any questions about recording refunds in QuickBooks Canada click the green button below to schedule a free consultation.

