If you’ve ever inactivated a bank account in QuickBooks Online without realizing it still had a balance, you might have been surprised by the result.
Instead of disappearing completely, the balance moves into Opening Balance Equity, creating a confusing situation in your books.
But don’t worry—this can be fixed.
In this guide, we’ll walk through what happens when you inactivate a bank account with a balance and how to restore and correct it in QuickBooks Online properly.
Quick Instructions:
- Navigate to the Chart of accounts
- Click the gear icon on the right
- Check off Include inactive
- Search for the account you inactived, click Make active
- Click View register
- Sort by Date
- Click the transaction with the “Created by QB Online” memo
- Click Edit
- Click More -> Delete at the bottom of the screen
- Click Delete on the pop-up
Keep reading for a complete walkthrough with screenshots:
What Happens When You Inactivate a Bank Account in QuickBooks?
The Immediate Effect
When you make a bank account inactive, QuickBooks removes it from your Chart of Accounts.
However, if the account still has a balance, QuickBooks automatically moves that balance into Opening Balance Equity.
You won’t receive a warning that this will happen, so it can catch many users off guard.
Why This Matters
The Opening Balance Equity account is essentially a placeholder for unexplained balances.
If QuickBooks moves your bank account balance there, it creates two major problems:
- You lose track of where that money actually went.
- Your balance sheet now includes inaccurate equity.
How to Fix an Inactivated Bank Account with a Balance
If you’ve already made a bank account inactive and need to restore it and correct the balance, follow these steps:
Reactivate the Inactivated Bank Account
Click Transactions in the left-hand menu. Select Chart of Accounts.
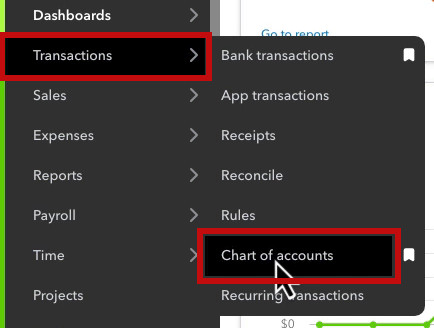
Click the gear icon in the upper-right corner.
Check the box for Include inactive accounts to see all your accounts, including the inactive ones.

Look or search for the account you inactivated. Click Make Active in the action column.
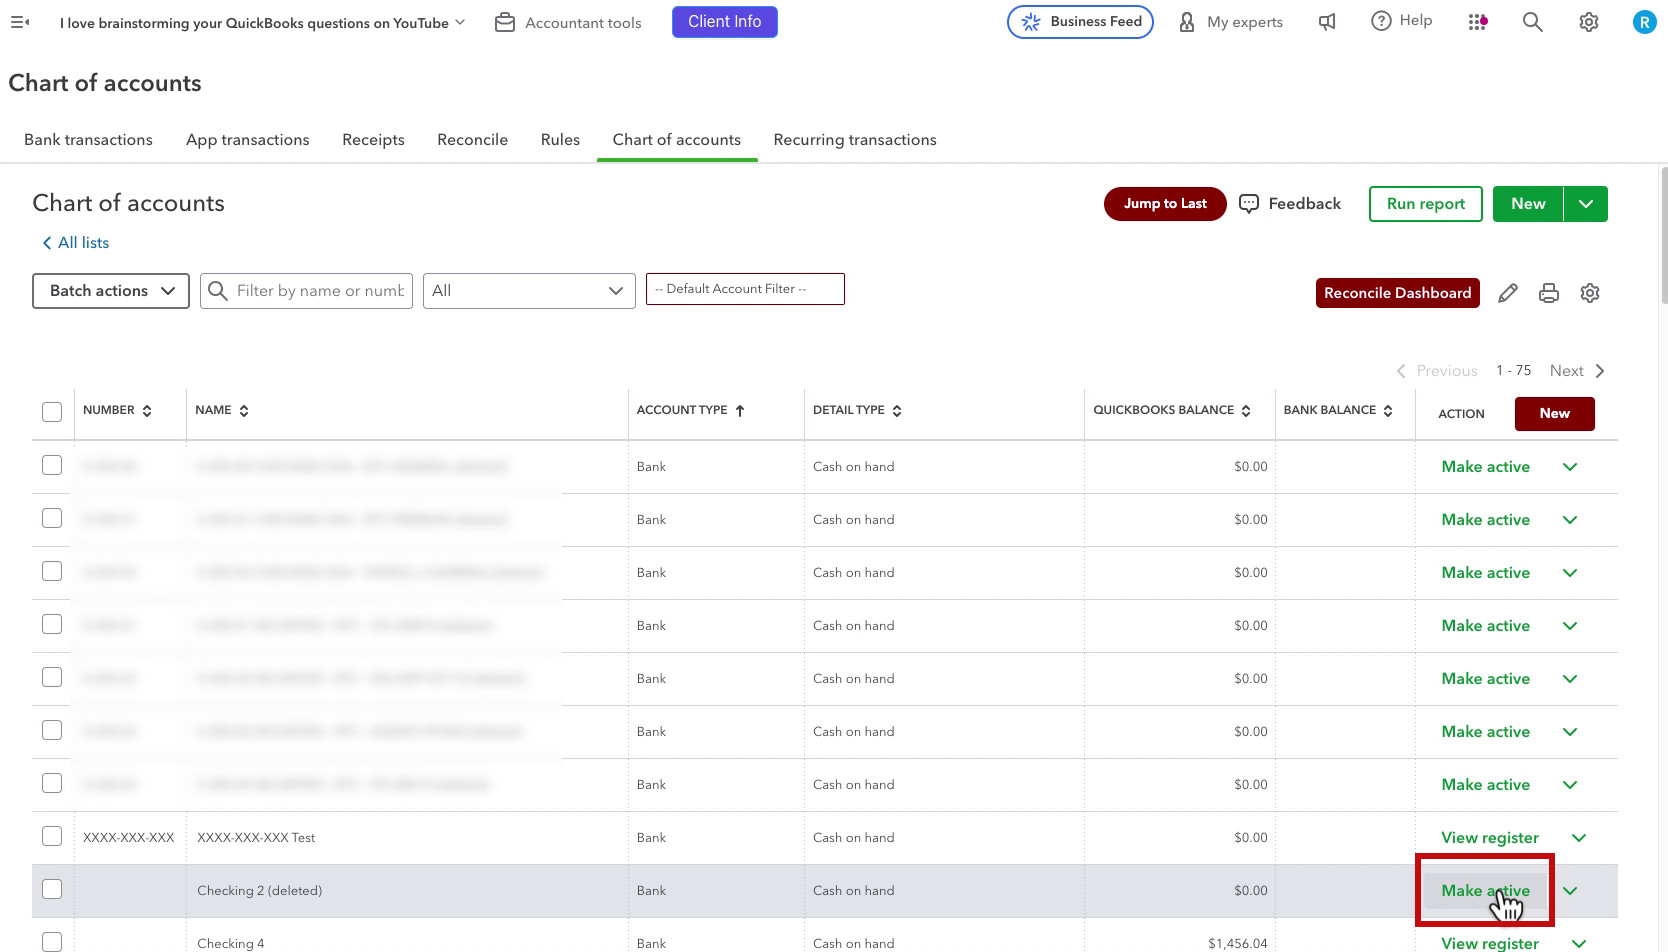
Now, the account will reappear in your Chart of Accounts, but it still needs corrections to restore the original balance properly.
Locate the Opening Balance Equity Entry
Now that the account is active you can click View Register to see all its transactions.

Click the Date column to sort recent entries first.
Look for a transaction where the memo includes the words “Created by QB Online to adjust.”

Click on the transaction. Then click Edit.

Click More at the bottom of the screen, and select Delete.

On the pop-up, click Delete to confirm that you want to delete it.
🚨 Important: Deleting this entry does not remove the money from your books—it just restores the original balance to the reactivated bank account.
Properly Record Where the Money Went
Now that the account is active and has its balance restored, you need to correctly record what happened to the money.
If the money was transferred to another account:
- Click + New > Transfer.
- Select the original bank account as the “From” account.
- Select the destination bank account as the “To” account.
- Enter the correct amount and date of the transfer.
- Click Save and Close.
If the money was used for expenses before closing the account:
- Click + New > Expense.
- Choose the original bank account.
- Enter the details for where the money went (e.g., vendor, category, amount).
- Click Save and Close.
If the money was withdrawn as cash or a check:
- Record the withdrawal as an expense using the owner’s draw account or a relevant business category.
How to Avoid This Issue in the Future
To prevent accidentally inactivating a bank account with a balance, follow these best practices:
Always review the balance before deactivating an account.
- If an account has a balance, resolve it before making it inactive.
Use Transfers instead of inactivating accounts with money in them.
- If you’re moving funds from one account to another, record it as a Transfer before inactivating.
Check the Opening Balance Equity account regularly.
- If this account has unexpected transactions, investigate and correct them immediately.
If you accidentally inactivate a bank account with a balance, don’t panic! You can reactivate the account, delete the incorrect QuickBooks entry, and properly record what happened to the money.
By following these steps, you’ll keep your QuickBooks records clean, accurate, and easy to reconcile.
☕ If you found this helpful, you can say “thanks” by buying me a coffee… https://www.buymeacoffee.com/gentlefrog
If you have questions about inactivating/activating accounts in QuickBooks Online, click the green button below to schedule a free consultation.
Watch the videos below if you’d like to see a walkthrough: