
In this tutorial, I’ll show you how to create a copy of your QuickBooks Desktop file. Then how to remove specific data, by date, from that file.
This will allow you to create a file you can send to an auditor with just the data they need to see.
Quick instructions:
- Create a copy of your QuickBooks file to edit
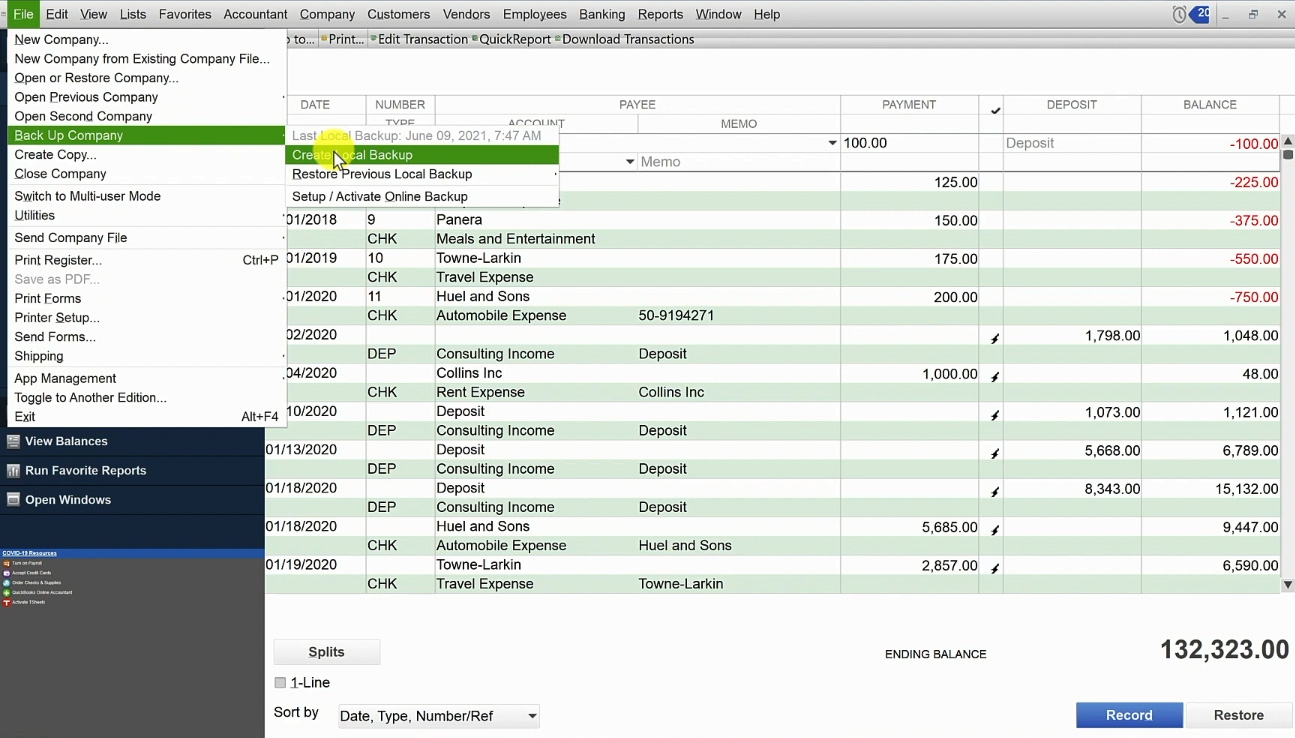
- Click File -> Back Up Company -> Create Local Backup
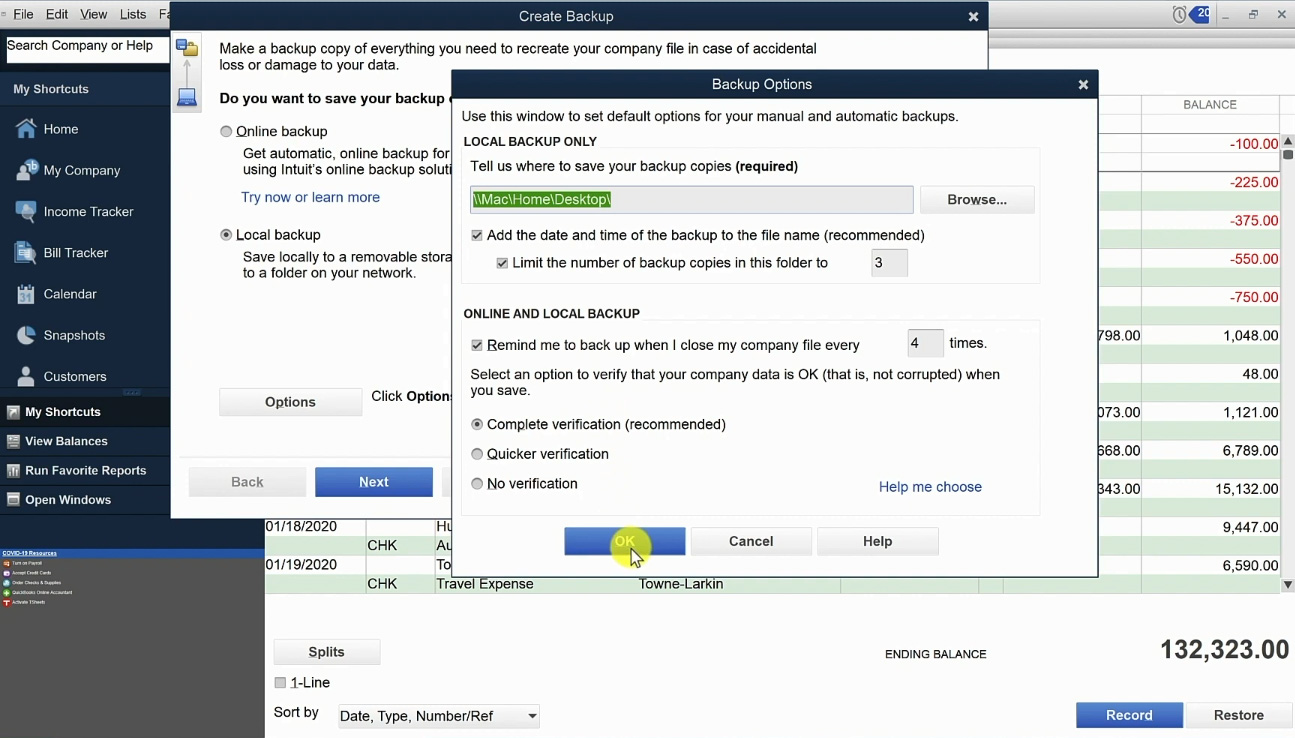
- Select to store your backup locally then click the blue Next button
- Browse to where you’d like to save your file. Check off “Complete Verification” then click the blue OK button
- Select to save your backup now and click the blue Next button
- Close your working company file
- In the main menu click File -> Close Company
- Open your QuickBooks file copy
- In the No Company Open box click “Open or restore existing company” and click Next
- Select “Restore a backup copy” and click Next
- Select “Local backup” and click Next
- Select the backup/copy file you just created and click Open and then Next
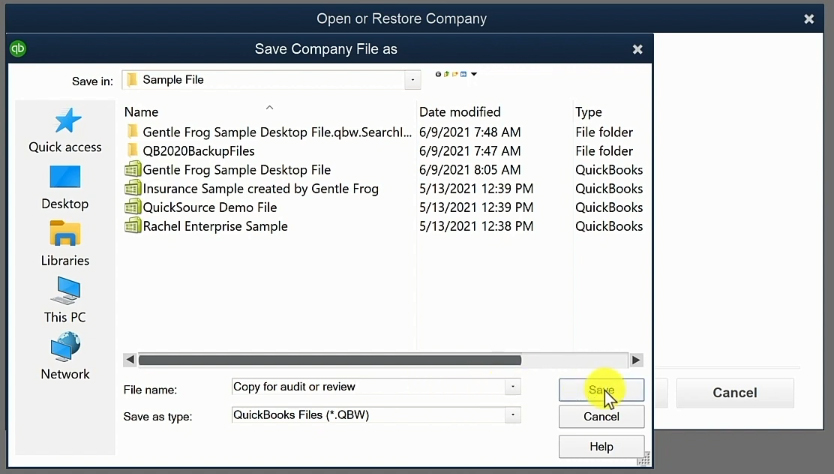
- On the “Save Company File as” screen name your file something completely different from your regular QuickBooks file and click Save
- Optional: Change display name
- Click Company in the main menu then select My Company
- Click the pencil icon above Company Information
- Edit the Company Name field and click the blue OK button
- Remove information you don’t want to send to your auditor
- In the main menu click File -> Utilities -> Condense Data
- Select “Remove the transactions you select from your company file” and click Next
- Select the option for removing data that matches your circumstance, enter dates if applicable and click Next
- Click Yes on the Confirm your choice pop-up
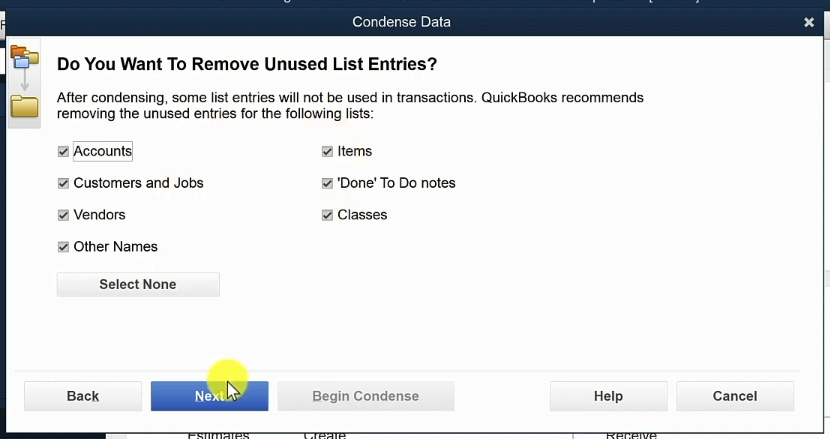
- When it asks “Do You Want to Remove Unused List Entries?” click Yes
- Click Begin Condense
Keep reading for full instructions with screenshots.
For this training, I’m using QuickBooks Desktop 2021. But this works with any version of QuickBooks Desktop. Pro or Premium and whatever year you’re currently using.
In this example, I want to only provide data from 2017-2019.
I’ll start by making a copy of the QuickBooks file, this is the one I’ll edit.
To do this click on File in the main menu, then Back Up Company -> Create Local Backup.
In the Create Backup box that pops up select whether you’d like your backup stored online or locally. For this example, I’ll backup up locally. Now click the blue Next button.
Browse to where you’d like the save the file. Then under ONLINE AND LOCAL BACKUP I like to check off “Complete verification.” Then click the blue OK button.
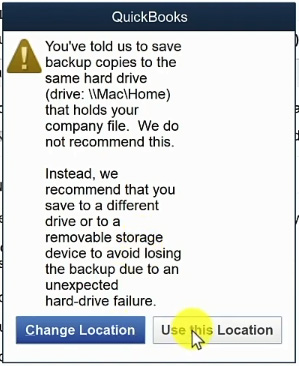
If you’re saving the backup to the same drive that your company file is on. It will popup a warning and suggest saving to a different drive. It’s a good idea to save to a different drive for a real backup but for a temporary backup, the same drive is fine.
It’ll then ask when you want to save your backup (now or scheduled). Select now and click Next. It will take a moment and then let you know that the file is saved.
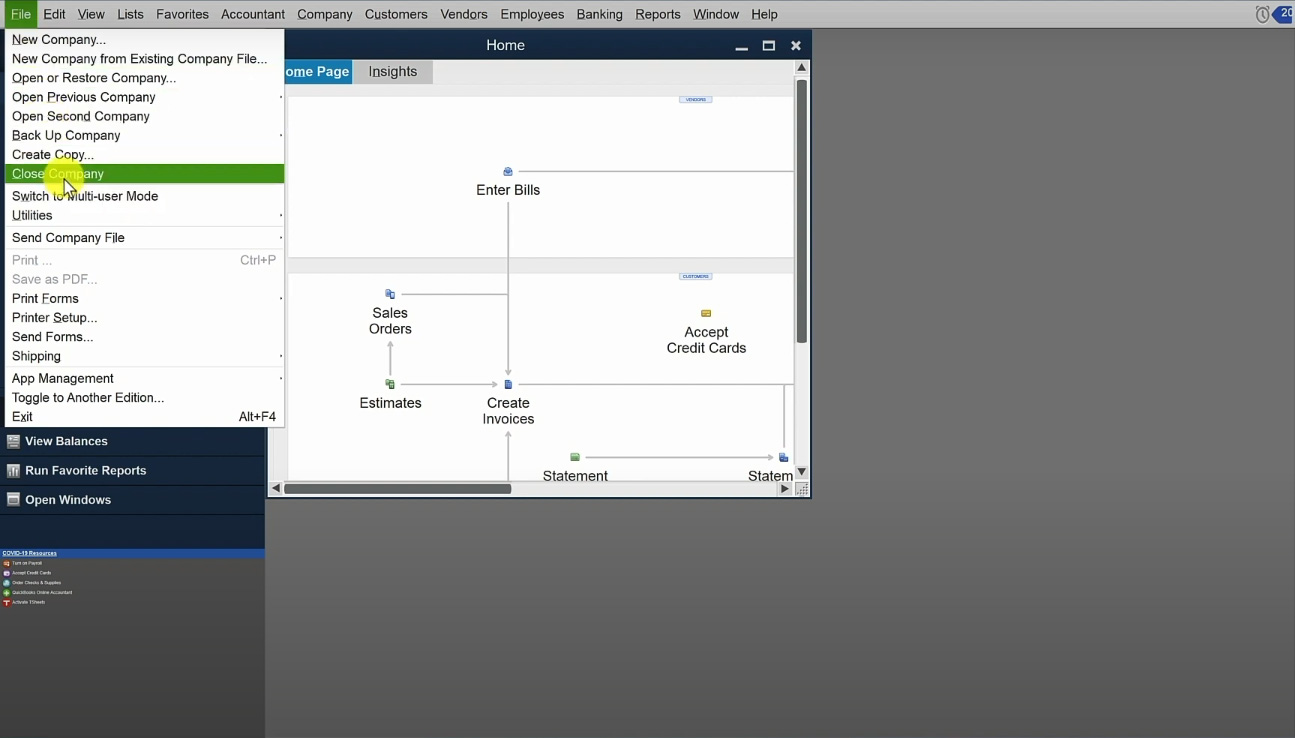
I’m now going to close my “real” QuickBooks file and open the copy I just created so I can edit it.
From the main menu click File -> Close Company
A box will appear announcing that you have No Company Open. To open the file you just created click the “Open or restor an existing company” button.

On the next screen select “Restore a backup copy” and click Next. Then select “Local backup” and click Next. Select the file you just created and click Open. Click Next again.
Now on the “Save Company File as” screen I suggest you give your file a completely different name. Otherwise, you’ll just override the data in your regular file and defeat the purpose of creating the backup.
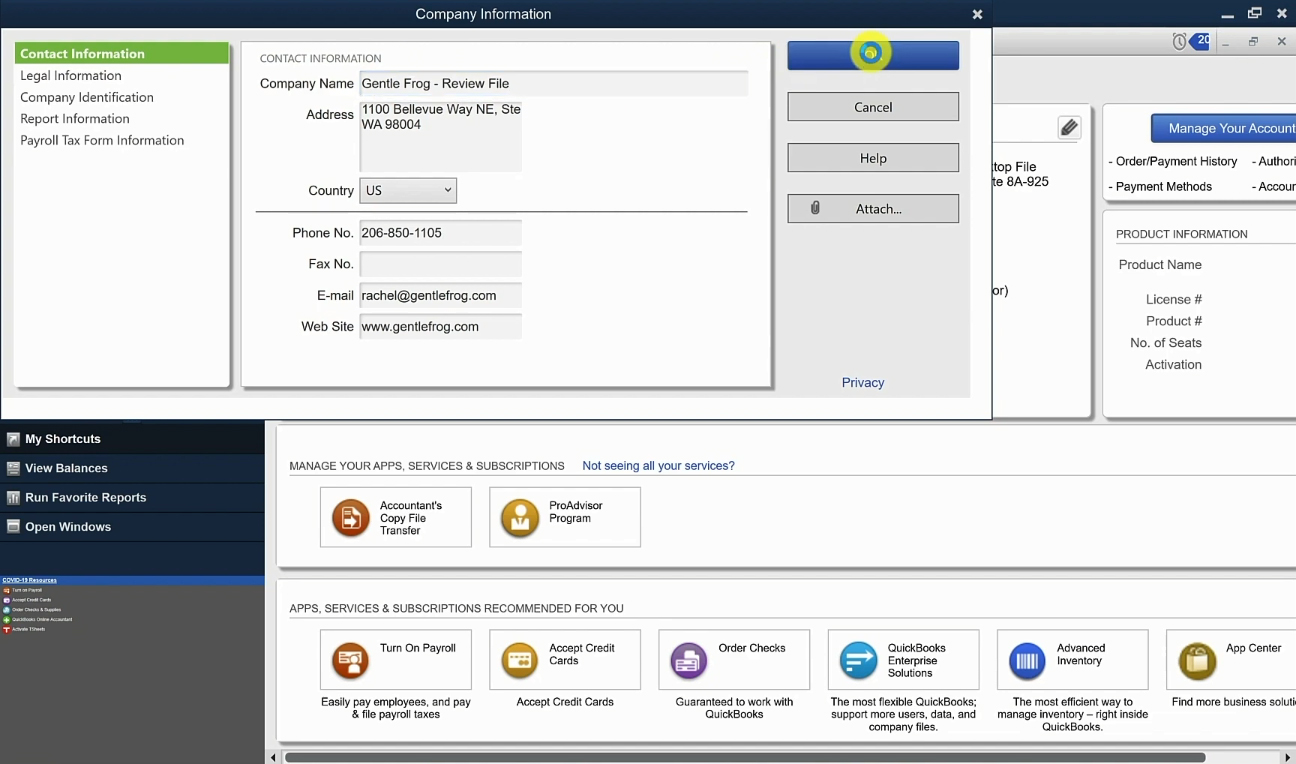
Even though I changed the name of the file itself. The display name across top of the Quickbooks file will be the same as your original file.
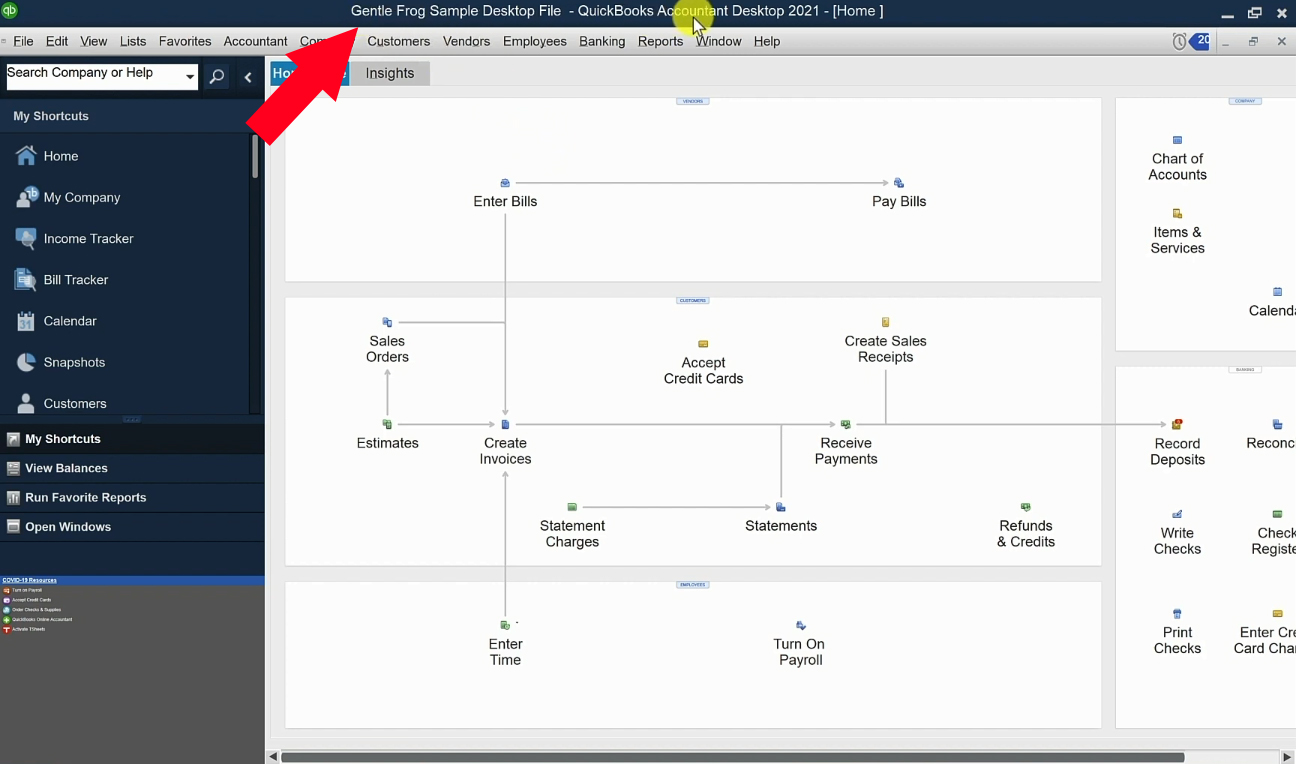
I like to change this name so I know for sure which file I’m in and avoid accidentally editing the wrong file.
To edit this display name click on Company in the main menu then select My Company.
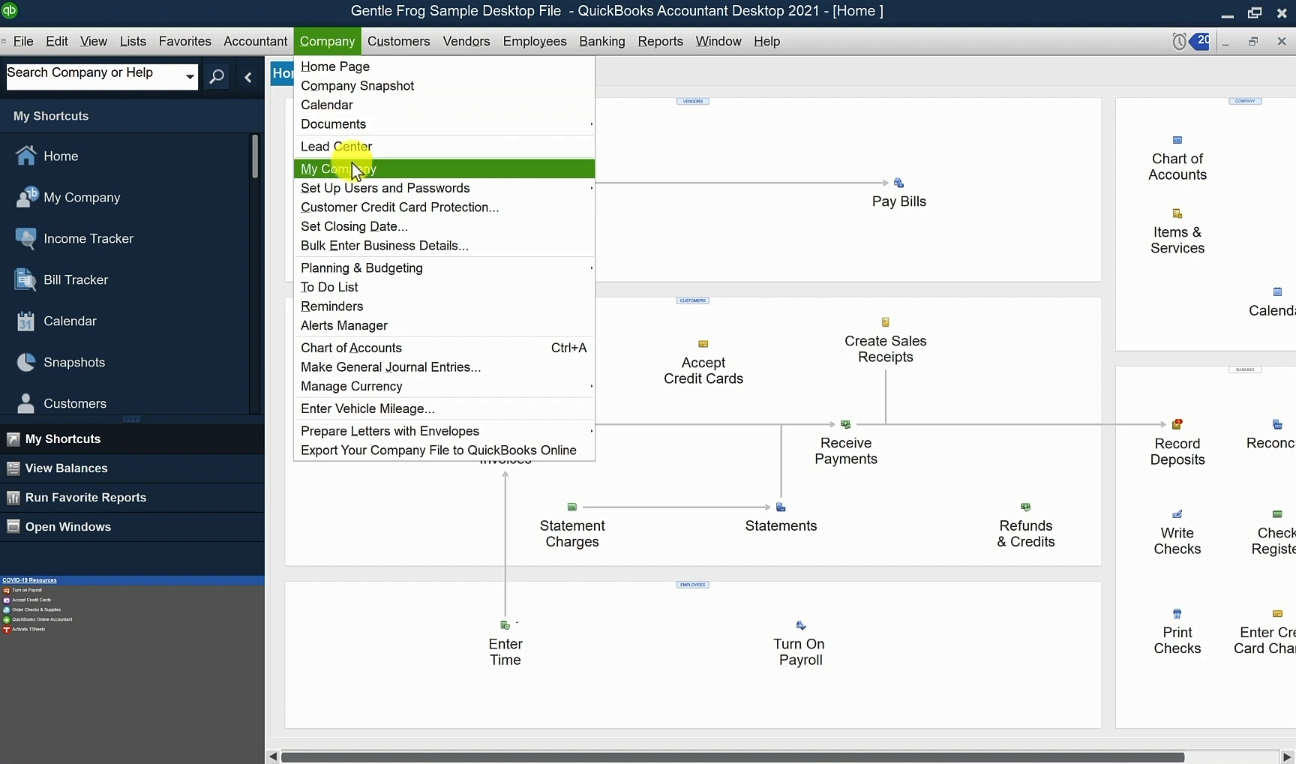
Click on the pencil icon above Company Information.
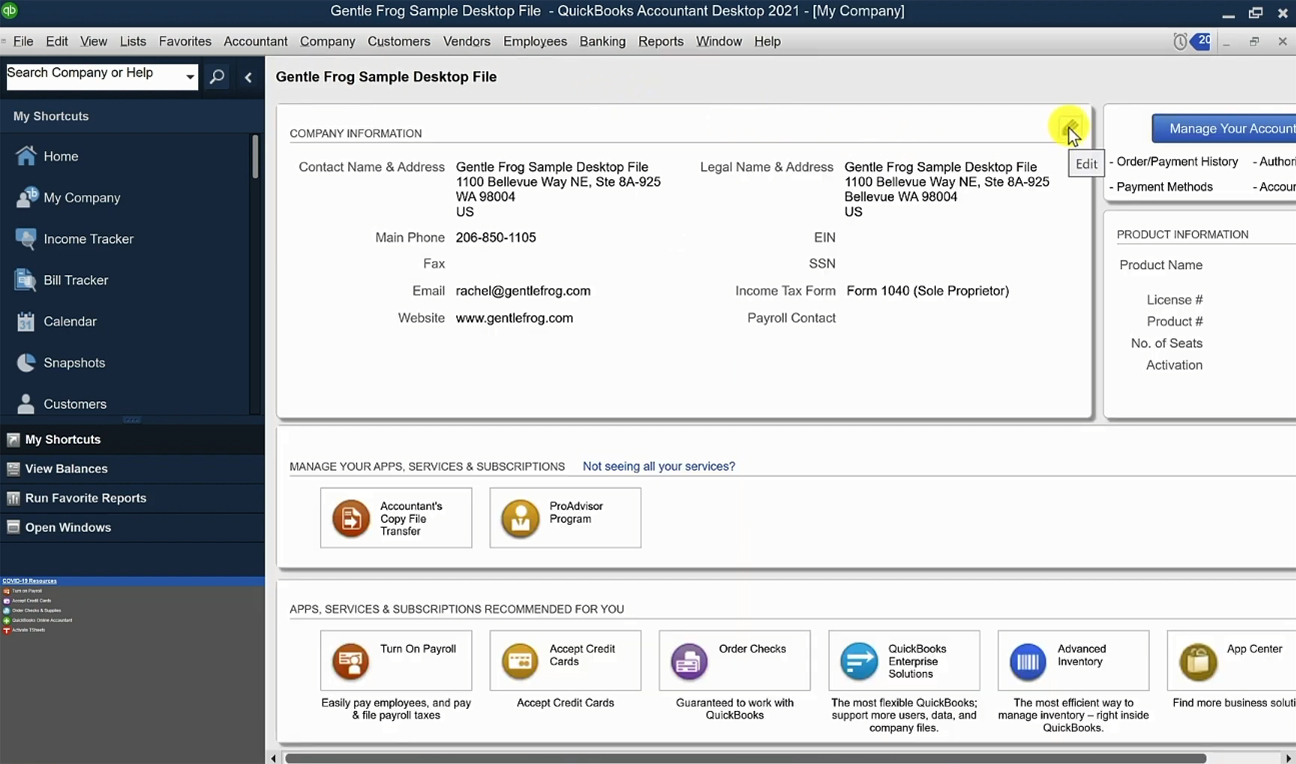
In the Company Name field enter a name that will allow you to recognize this as the file that’s getting edited. I use “Gentle Frog – Review File.”
Then click the blue OK button to save the change.
I’m going to go and remove the information I don’t need to send to my auditor. That’s anything before 2017 and after 2019.
To do this from the main menu click File -> Utilities -> Condense Data

The Condense Data pop-up will appear asking “How do you want to condense your company file?” Select “Remove the transactions you select from your company file” and click the Next button.
On the next screen, we’ll select what data to keep/remove.
For this example, I select “Transaction outside of a date range” and then enter the dates between which I want to keep data.
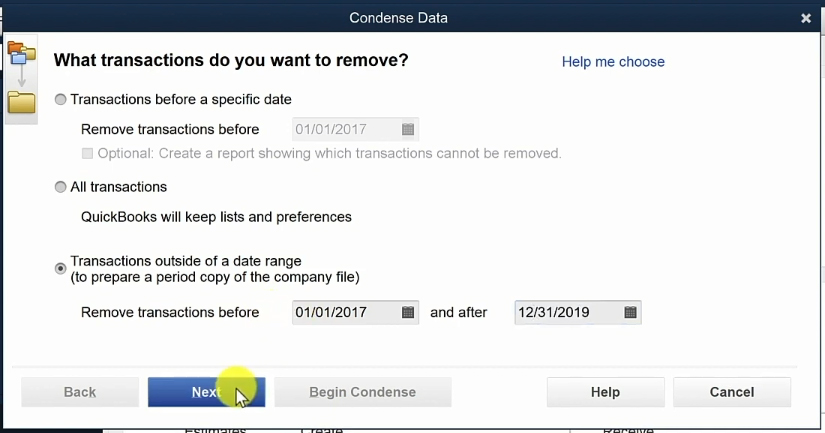
Note: The condense data option for a specific before and after date is only available in the Accountant version of Quickbooks Desktop
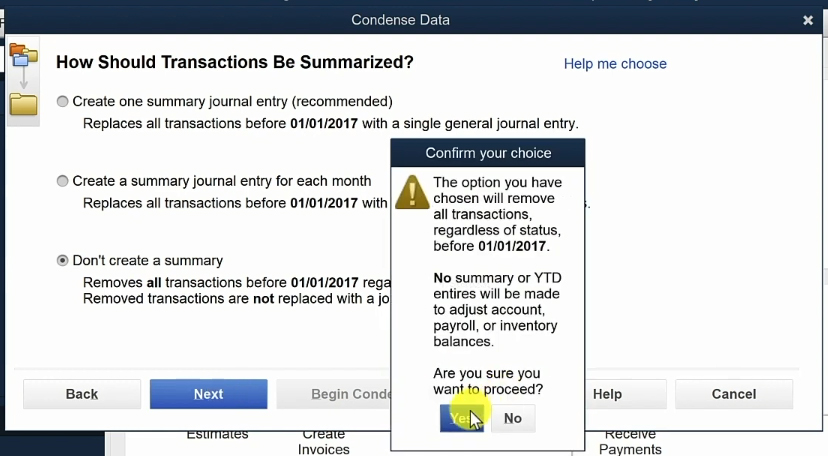
After clicking the Next button you’ll be asked “How Should Transactions Be Summarized?” For this example we do not need a summary so select “Don’t create a summary” and click Next.
You’ll get another pop-up to confirm you want to remove data. Click Yes to proceed.
It will then ask “Do You Want to Remove Unused List Entries?” I don’t care about these lists so I’ll keep them checked and click Next.
We’ve now reached the final screen. Click Begin Condense to condense your file.
Once it’s finished I like to be 100% sure that it’s actually removed the data I want it to remove.
To do this we’ll check the Chart of Accounts. Click Lists in the main menu and then Chart of Accounts.

In the Chart of Accounts, you can open an account and check that everything is within the correct date range.

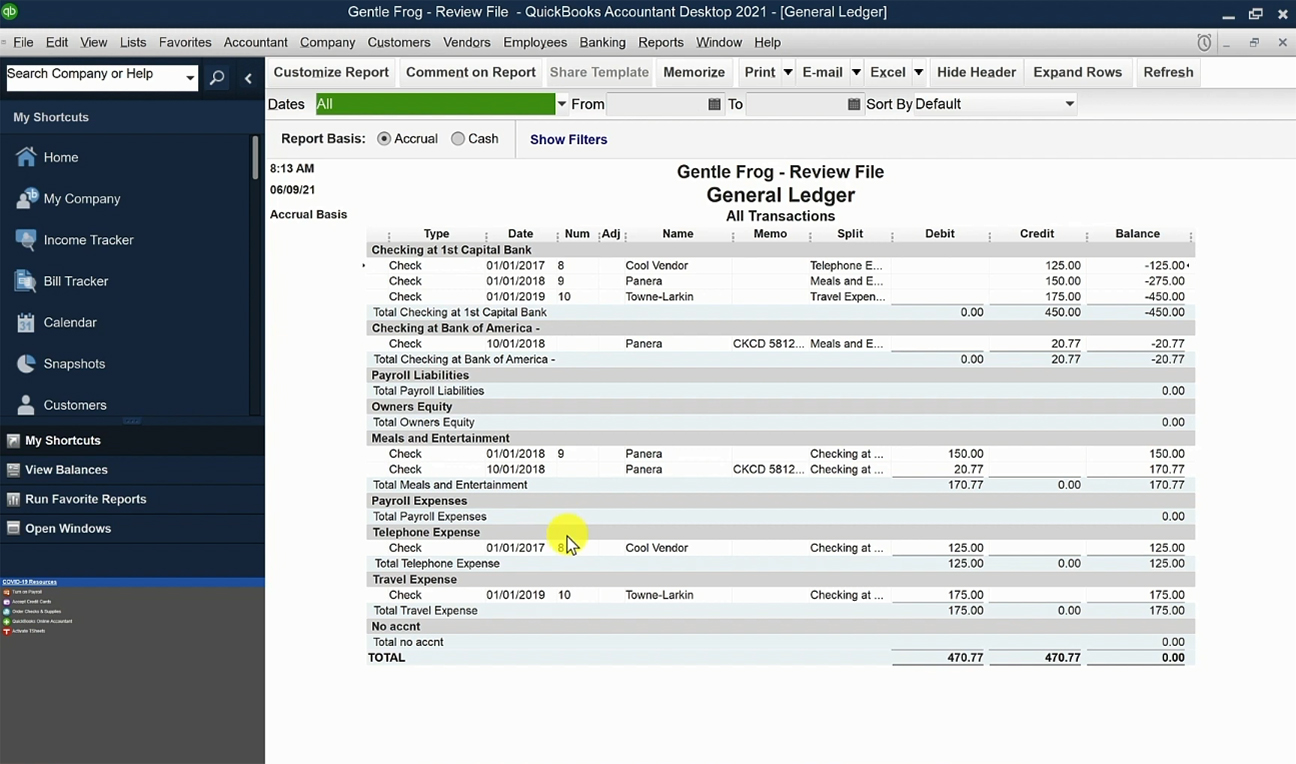
You can also check in the General Ledger. In the main menu click Reports -> Reports & Taxes -> General Ledger
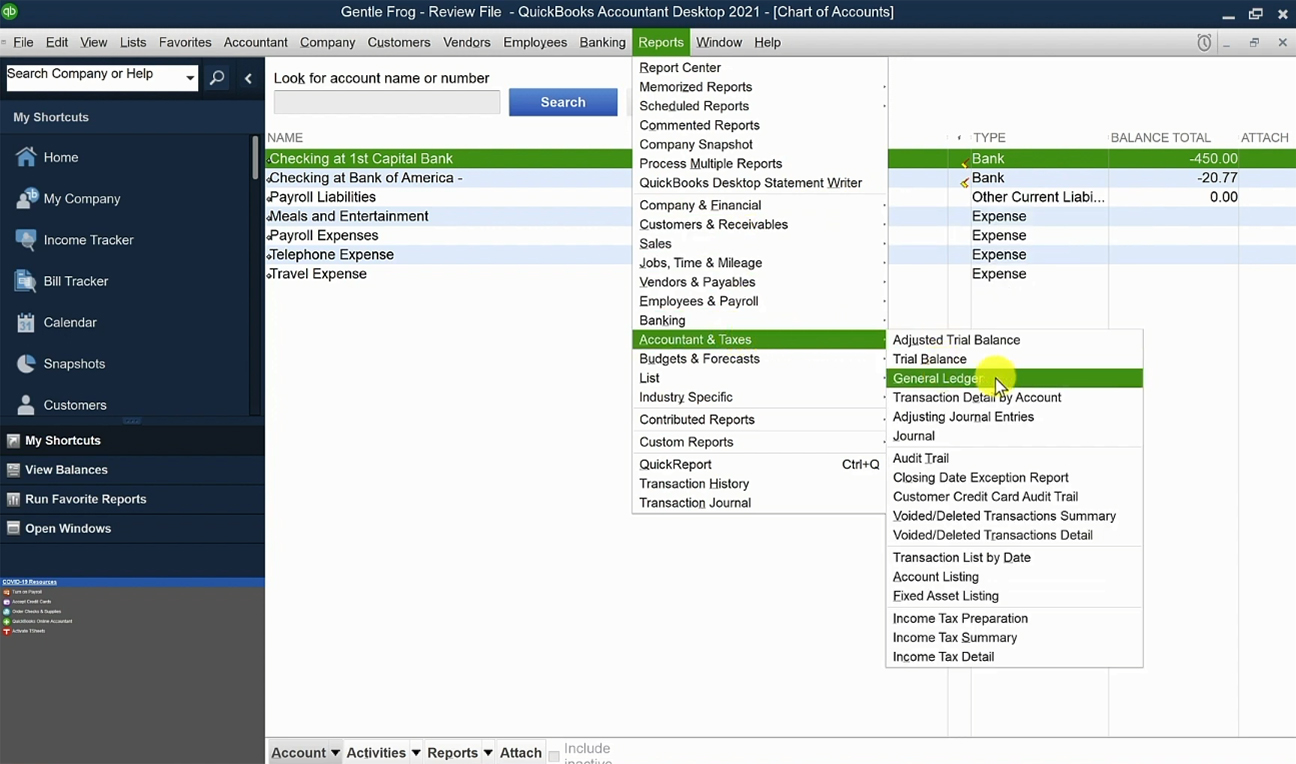
The General Ledger is a list of everything that’s in your QuickBooks file.
At the top of the ledger in the Dates dropdown select All. This will show you all the transactions. I can see in my example that all the transactions fall into the date range I wanted.
Now that we’ve verified that the file has the correct data I’m going to send it to my auditor.
To do this I create a local backup of this file just like we did to start with our working file.
Now you can send this edited file to your auditor. If you have any questions please ask them in the comments. Or click the green button below to schedule a free consultation.
☕ If you found this helpful you can say “thanks” by buying me a coffee…
https://www.buymeacoffee.com/gentlefrog
If you’d like to watch me walk through this process check out the videos below:


6 Responses
I have Quickbooks Desktop Pro 2021 and this helped but contained errors in the “Condense Data” instructions. When I follow the directions a “Pop Up” box comes up “Remove transactions before” box but it doesn’t allow me to delete transactions before and after a specific date which is what I need to perform? I’ll have to look elsewhere for directions.
Mark, you don’t see the option “Transactions outside of a date range”? That is what you would use to delete transactions before and after a specific date. Here’s the part of the video that shows this: https://youtu.be/ACUIxV9K2Uo?t=430
-Jess
It is because this OPTION is ONLY available in the “Accountant” version of QBD now, Sadly!
Hi Marshall,
It’s a shame that this is only available for Accountant versions. It’s a very handy feature. If you need this for your own QuickBooks we do make backup copies of QB and segment the data for clients, it costs $150.
-Jess
How is this handled with QBO?
Hi Dustin,
You can’t divide data in QBO like you can in QBDT. Offer to send the auditor whatever PDFs or Excel files they want. I would not give them direct access.
-Jess