The Chart of Accounts is an important tool in QuickBooks Online. It organizes your financial data into categories for easy bookkeeping and reporting.
Whether you’re renaming accounts, merging duplicates, or cleaning up unused accounts, knowing how to edit your Chart of Accounts can help make your bookkeeping easier.
In this guide, we’ll walk you through:
- How to access the Chart of Accounts.
- Editing account details.
- Merging accounts.
- Making accounts inactive or active again.
- Various ways to navigate to your Chart of Accounts.
Let’s dive in!
Accessing the Chart of Accounts
There are several ways to access the Chart of Accounts in QuickBooks Online. Here are the most common methods:
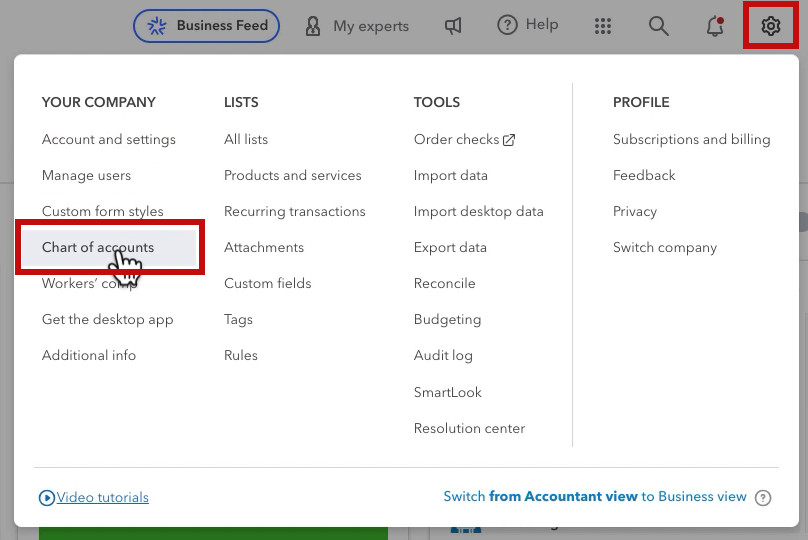
From the Gear Icon:
- Click on the Gear icon in the upper-right corner.
- Under the Your Company section, select Chart of Accounts.
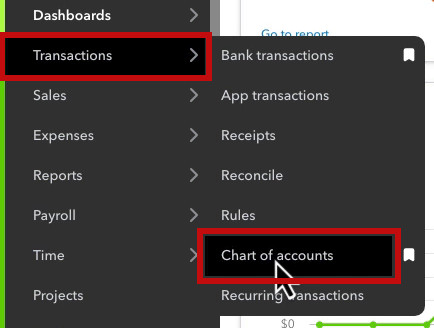
From the Transactions Menu:
- Navigate to the left-hand menu and click on Transactions.
- Select Chart of Accounts from the dropdown.
Using Bookmarks:
If you frequently use the Chart of Accounts, you can add it to your bookmarks:
- Click the pencil icon next to Bookmarks in the left-hand menu.
- Search for “Chart of Accounts” and select it.
- Click Save to pin it to your bookmarks.

Transactions Screen:
- Click the BANK ACCOUNTS widget on your home page or Transactions on the left menu.
- Click Chart of accounts in the ribbon at the top.

How to Edit Accounts in the Chart of Accounts
Once you’ve accessed the Chart of Accounts, here’s how to make changes:
Editing Account Details
- Locate the account you want to edit in the list.
- Click the dropdown arrow on the far-right side of the account row and select Edit.

- In the Edit Account window, you can:
- Change the Account Name: Update the name to better describe the account.
- Modify the Account Number: If account numbers are enabled, you can adjust them here.
- Adjust the Account Type: For example, change a mistakenly categorized line of credit from “Bank” to “Other Current Liability”.
- Select a Detail Type: The detail type rarely impacts functionality, but it may be required for certain merges or changes.
- Make a Sub-account: If needed, make the account a sub-account of another. The preview below shows how it will appear on the Balance Sheet.
- Click Save when you’re finished.


Note: You can add a description but it won’t appear outside the Edit Account window.
Batch Edits
- To quickly edit multiple accounts and/or account numbers:
- Click the pencil icon near the top of the Chart of Accounts list (below the New button).
- Update account names/numbers directly in the list.
- Click Save to apply changes.
- Click the pencil icon near the top of the Chart of Accounts list (below the New button).


Merging Accounts
Sometimes, you may need to combine two similar accounts into one. For example, you might merge “Office Supplies” and “Office Expenses” to simplify your chart.
How to Merge Accounts:
- Identify the account you want to keep and note its name.
- Locate the account you want to merge into the first account.
- Click the dropdown arrow and select Edit.
- Change the account name to exactly match the account name you’re merging it into.
- Click Save.
- Confirm the merge when prompted.
- Click Save.

Warning: Avoid merging bank accounts unless you’re absolutely sure of the consequences. Merging these accounts can cause significant issues with reconciliations and reporting.
Making Accounts Inactive or Active
If your Chart of Accounts is cluttered with unused accounts, consider making them inactive. This hides them from the active list but retains their data for historical purposes.
Making an Account Inactive:
- Find the account you want to deactivate.
- Click the dropdown arrow and select Make Inactive.
- Confirm the action when prompted.
Reactivating an Account:
- Click the small Gear icon near the top-right of the Chart of Accounts list (not the main Gear icon).
- Check the box for Show Inactive Accounts.
- Locate the inactive account you want to reactivate.
- Click the dropdown arrow and select Make Active.

Tips for Managing the Chart of Accounts
Keep It Organized:
- Use clear, consistent naming conventions to make navigation and reporting easier.
Avoid Overuse of Sub-accounts:
- Sub-accounts can add complexity to your Chart of Accounts. Only use them when necessary for detailed reporting.
Review Regularly:
- Periodically audit your Chart of Accounts to deactivate unused accounts and merge duplicates.
Be Cautious with Merges:
- Double-check account names, types, and numbers before merging to avoid errors.
Conclusion
Editing your Chart of Accounts in QuickBooks Online can help you maintain an organized and efficient bookkeeping system. Whether you’re renaming accounts, merging duplicates, or cleaning up inactive accounts, the steps outlined here will help you tailor your Chart of Accounts to suit your business needs.
Stay organized, stay efficient, and make the most of your QuickBooks Online experience!
☕ If you found this helpful you can say “thanks” by buying me a coffee… https://www.buymeacoffee.com/gentlefrog
Below is a video if you’d like to watch a walkthrough.
If you have questions about the Chart of accounts in QuickBooks Online, click the green button below to schedule a free consultation.