

In this tutorial, I’ll show you how to connect PayPal to your QuickBooks Online.
There are two ways to do this. One uses “Connect to PayPal” the other is the same way you’d connect a bank account.
Quick Instructions:
Connect to PayPal :
- Click Banking in the left-side menu
- If you have no bank accounts connected: Click the Connect account button
- If you have bank accounts connected: Click the Link account button on the right
- Search for PayPal
- Select Connect to PayPal
- Click Let’s do it
- Click Give permission
- Enter your PayPal accounts email address
- Click Next
- Click Go back to Intuit
- Click Next
- Click Next
- Or, edit the Account Name and click Save
- Select how far back you want to import transactions
- Click Done
- Click Check it out
Bank Account / Classic Method:
- Click Banking in the left-side menu
- If you have no bank accounts connected: Click the Connect account button
- If you have bank accounts connected: Click the Link account button on the right
- Search for PayPal
- Select the option that says PayPal
- Click Continue
- Log in to your PayPal account
- Click Agree and Continue
- Select the accounts you’d like to connect
- Select an account type from the drop-down
- Select how far back you want to import transactions
- Click Connect
- Click Review categories
Keep reading for a complete walkthrough with screenshots:
Connect to PayPal
To connect your PayPal account using PayPal Connect first click Banking in the left-side menu.

If you have a new QuickBooks account you’ll click the green Connect account button:

If you already have accounts connected to QuickBooks you’ll click the Link account button to the right:

On the Connect an account screen search for PayPal.
You’ll see a few different options appear.
For this example, we’re using the Connect to PayPal option.

The next screen gives you a quick overview of how this type of connection works. Click the green Let’s do it button to continue.

The next screen describes the permissions you’ll be giving PayPal. Click the green Give permission button.

Next, you’ll enter the email address associated with the PayPal account you’d like to connect and click Next.

You’ll get a Thanks for signing up message. Click the Go back to Intuit button.

You’ll go back to the first step, Give permission, and click Next.

The second step creates an account in your QuickBooks where your PayPal transactions will live.
You can click Next to continue. Or, you can click the pencil icon to change this account.
If you change the account click Save, then Next to continue.

The final step is selecting how far back you’d like the import to go. You can go back as far as 18 months.
It will have January of the current year selected. You can edit the date by clicking the pencil.
When you’re ready click Done.

It will now import your transaction which can take up to 6 hours. Click the green Check it out button to continue.

Why use this method over the “bank account” method? This method allows you to import your transactions as a Sale Receipt.

When I add this transaction it will automatically create a sales receipt for it. Here’s what that looks like.

Bank Account / Classic Method
To connect your PayPal account to QuickBooks Online like a bank account. Follow the steps for Connect to PayPal above until you get to the Connect an account screen.
Search for PayPal but instead of selecting Connect to PayPal select the option that just says PayPal.

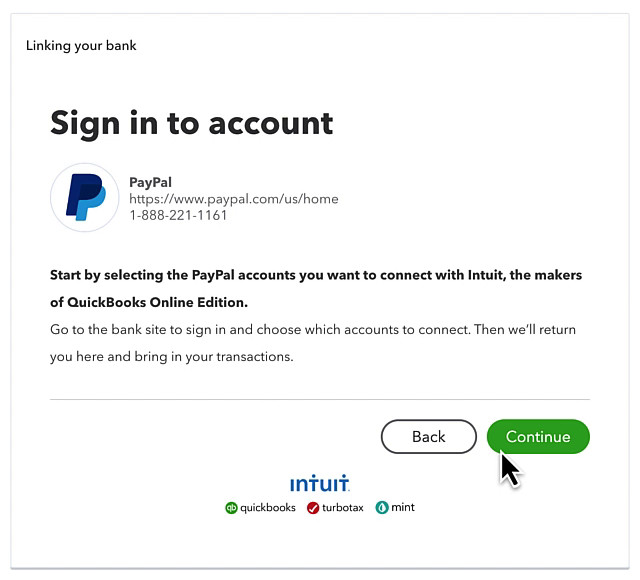
Next, you’ll see a Sign in to account screen, click the Continue button.
You’ll log in to your PayPal account and then see a screen that has you agree to let Intuit access your PayPal information. Click the Agree and Connect button.

It will take a moment to connect to PayPal and then ask you which accounts you’d like to connect.
If you have more than one PayPal account connected to the email address you logged into PayPal with you’ll see all the accounts in the list. Click the ones you’d like to add.
When you select an account a drop-down appears to its right with the text “Enter account type.” Here you’re telling QuickBooks which Chart of Accounts account you want to be associated with this PayPal account.
Next, you’ll get a drop-down for picking how far back you’d like to pull transactions.
In this example, I can only go back as far as 8/4/22. When using Connect to PayPal I could go back as far as 18 months.
Select a date and click the Connect button.

You’ll then see the Bringing in your Transactions screen while you wait for transactions to import.
Once the transactions are imported it’ll show you the See where your money goes screen. From here you can link another account. Or, click Remind me later to go back to the QBO home screen. The third option is the Review Categories button which takes you to the Banking screen where you can review your PayPal transactions.

When you connect PayPal to QuickBooks using this method the transactions look the same as they do for bank accounts. You have the option to enter them as Deposits or Transfers but not as Sales Receipts.
If you want your PayPal transactions to automatically import as Sales Receipts use the Connect to PayPal method instead.
You now know how to connect your PayPal account to your QuickBooks Online.
☕ If you found this helpful you can say “thanks” by buying me a coffee… https://www.buymeacoffee.com/gentlefrog
Below are videos if you prefer to watch a walkthrough.
If you have any questions about connecting PayPal to QuickBooks Online click the green button below to schedule a free consultation.
We are not affiliated with PayPal and do not provide technical support for Paypal. Please follow this link for PayPal support questions: https://www.paypal.com/us/smarthelp/contact-us


One Response
This is just what I needed – I’m looking to create Sales Receipts and was limited by the bank account setup. Thanks for sharing this info!