When’s the last time you checked who has access to your QuickBooks Payments account?
Over time, it’s easy to accumulate a list of users who no longer need access.
Whether it’s a former accountant, an old email you no longer use, or a team member who’s moved on.
Leaving them connected could be a security risk.
In this post, we’ll walk through how to remove users from QuickBooks Payments (your QBO merchant services account), step by step.
We’ll also talk about why this is an important housekeeping task for your bookkeeping security.
Why You Should Regularly Check Who Has Access to QuickBooks Payments
Granting access to QuickBooks Payments is necessary when collaborating with team members, accountants, or business partners. But when those working relationships end or roles change, it’s easy to forget who still has access.
Here’s why you should care:
Old users can still view sensitive information.
You might be granting access to inactive or even closed files.
It’s a security risk. Anyone with access can see payment info and business details.
If someone no longer needs to be there, it’s time to remove them.
Step-by-Step: How to Remove Users from QuickBooks Payments
Let’s walk through how to access your QuickBooks Payments settings and clean up user access.
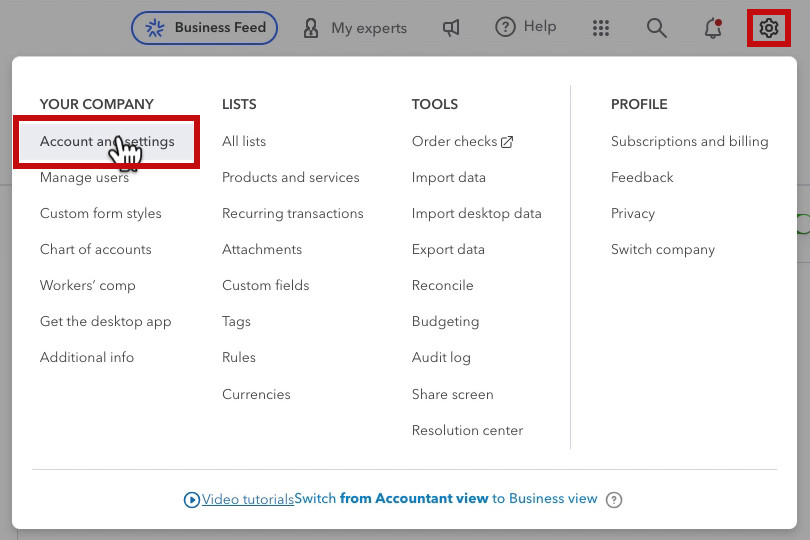
1. Open Account and Settings
Go to the gear icon in the upper right corner of your QuickBooks Online screen.
Select Account and Settings
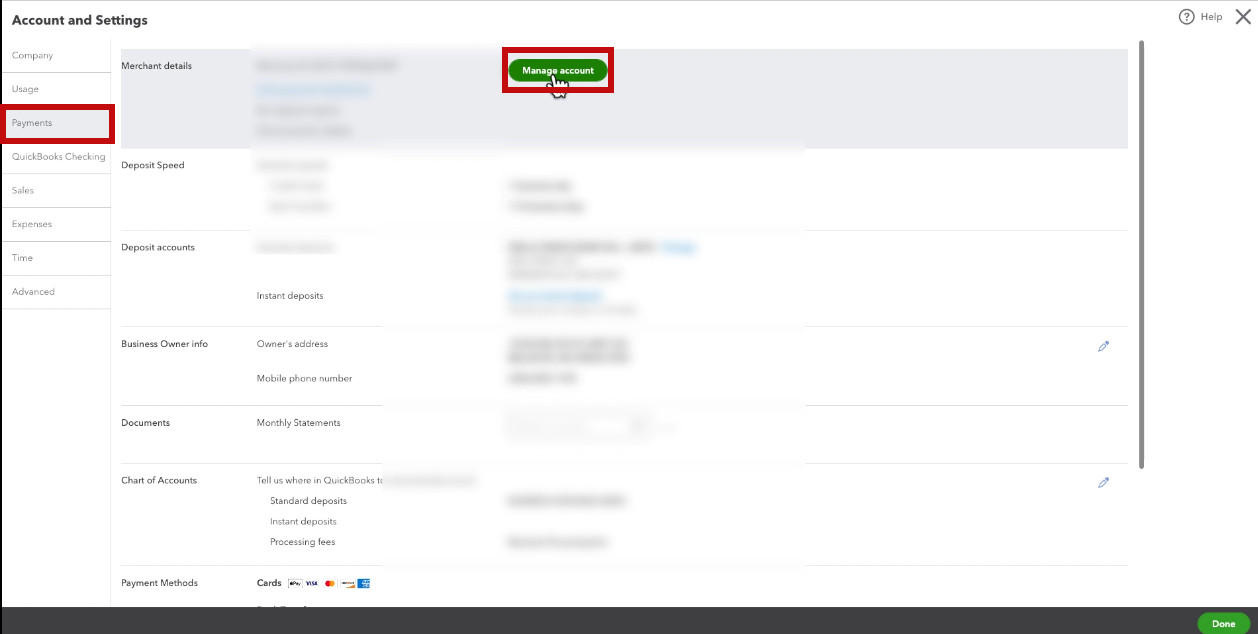
2. Navigate to Payments
Once you’re in the settings:
Click on Payments from the left-hand menu.
Then click Manage Account.
This opens your QuickBooks Payments dashboard in a new tab.
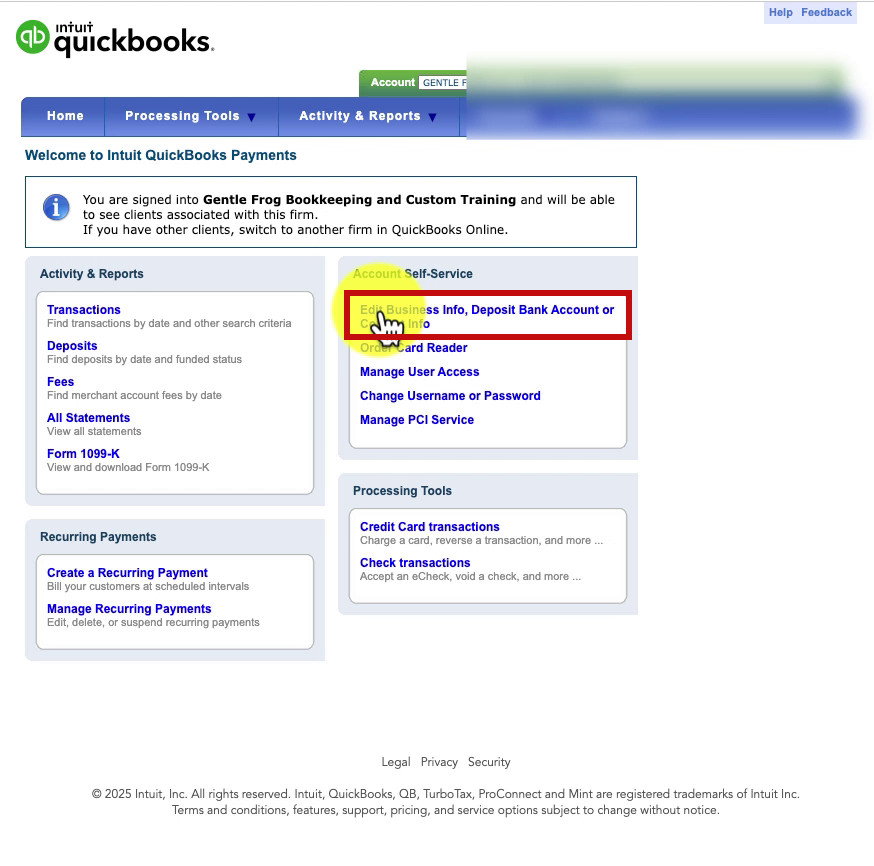
3. Review Your Business Info
Once inside the merchant services portal:
Look to the right for the Account Self Service section.
Click Edit Business Info.
Review and update any outdated information. Make sure your business name, address, and contact info are current.
💡 Tip: This is also where you can remove American Express as a payment option for clients if you don’t want to accept it.
Once everything looks good, click the back arrow to return to the main screen.
4. Check and Manage User Access
Now, it’s time to clean up access.
Click Manage User Access.

You’ll now see a list of users who currently have access to your QuickBooks Payments account. You might be surprised by who’s still there, like an old email, a former bookkeeper, or a friend who helped set things up years ago.
5. Remove Old or Unneeded Users
For each person who no longer needs access:
In the Role column, select their current role then select No Access.
Select X next to their current role, read the prompt, then select the checkbox.
Select OK, delete this user.

That’s it! Repeat the process for every user you want to remove.
What Happens When You Remove a User?
Once a user is removed:
They can no longer log in to your merchant services dashboard.
They lose access to view payment activity or make changes.
Their association with your merchant account ends, even if they still have access to your main QuickBooks file (you can handle that separately).
Bonus: Check Other Accounts You Have Access To
In some cases, you may still have access to other people’s merchant accounts. Including accounts from clients you worked with years ago, or businesses you no longer manage.
Here’s how to clean those up:
From your QuickBooks Payments dashboard, check if you’re listed as a user under any external accounts.
If so, reach out to the account owner and ask them to remove your access.
Keeping Your Merchant Services Secure
Managing your merchant services user list is more than just digital spring cleaning, it’s a way to:
Maintain financial security
Stay compliant with privacy best practices
Prevent accidental access or changes by people who shouldn’t be in the system
It only takes a few minutes, but it’s one of those tasks that makes a big difference.
Final Thoughts
Your QuickBooks Payments account contains some of your most sensitive business data. It’s worth taking a few moments to review who has access and make sure the list only includes the people who actually need it.
Use this post as your reminder to remove users from QuickBooks Payments and tighten up your access list.
📌 Need help doing this or managing user roles in QuickBooks? Book a training session with Gentle Frog and we’ll walk through it together.